Udacity’s Ensuring Quality Releases: A Local Setup Guide
Explore how to set up and run Turing Taqueria, a FastAPI application, in a Docker container. This guide covers authentication, API interaction, and using Swagger UI for a seamless development experience, ideal for Udacity's 'Ensure Quality Releases' project.


Overview
In our previous article, we discussed some of the shortcomings of Udacity's Ensuring Quality Releases project.
This article will introduce the first step to address those shortcomings. Turing Taqueria is an application written to be used at each step of Udacity's Ensure Quality Releases project.
Before diving into the Azure-specific tasks, we must familiarize ourselves with Turing Taqueria locally.
Besides, we can write the tests against the locally running application, which helps us optimize the available lab time, ensuring we can use it for Azure-related activities.
Let's start by running Turing Taqueria on our local machine.
Forking and Cloning the Turing Taqueria Repository
Begin by creating your copy of Turing Taqueria:
Fork the Repository:
- Visit Turing Taqueria on GitHub.
- Click the 'Fork' button to create a fork under your GitHub account.
Clone Your Fork:
- Navigate to your forked repository on GitHub.
- Click the 'Code' button and copy the URL for cloning.
- Clone the repository to your local machine using the following:
$ git clone
Now you have a local copy of the Turing Taqueria project, ready for Dockerization and running it locally.
Creating the Docker Image for Turing Taqueria
To begin, could you clone the Turing Taqueria repository from GitHub? Inside the project, you'll find a Dockerfile designed for setting up the environment. Here's how to create your Docker image:
- Clone the Repository:
git clone https://github.com/TheTuringTacoTales/TuringTaqueria-FastApi.git - Navigate to the Project Directory:
cd TuringTaqueria-FastApi - Build the Docker Image:
Rundocker build -t turingtaqueria .This command reads the Dockerfile in the current directory, building a Docker image namedturingtaqueria.
This Docker image encapsulates all the dependencies and setups required, streamlining the initial run of the application on your local machine.
Running Turing Taqueria Locally with Docker
With your fork of Turing Taqueria cloned, let's run it locally using Docker:
- Install Docker:
If you don't have Docker installed, download it from the official website. Follow the installation guide for your operating system. - Navigate to Your Local Repository:
Open a terminal and navigate to the cloned Turing Taqueria directory. - Build the Docker Image:
Next, we'll run the command to create a Docker image.
$ docker build -t turingtaqueria .
- Run the Application:
Next, we'll start the application to run a container using the image we created in the previous step and mapping port 8000 on our host machine to port 80 in the container, which is the port that the application uses.
$ docker run -d -p 8000:80 turingtaqueria
- Access the Application:
Now, we can browse tohttp://localhost:8000and see our FastAPI application running. - Explore API Documentation:
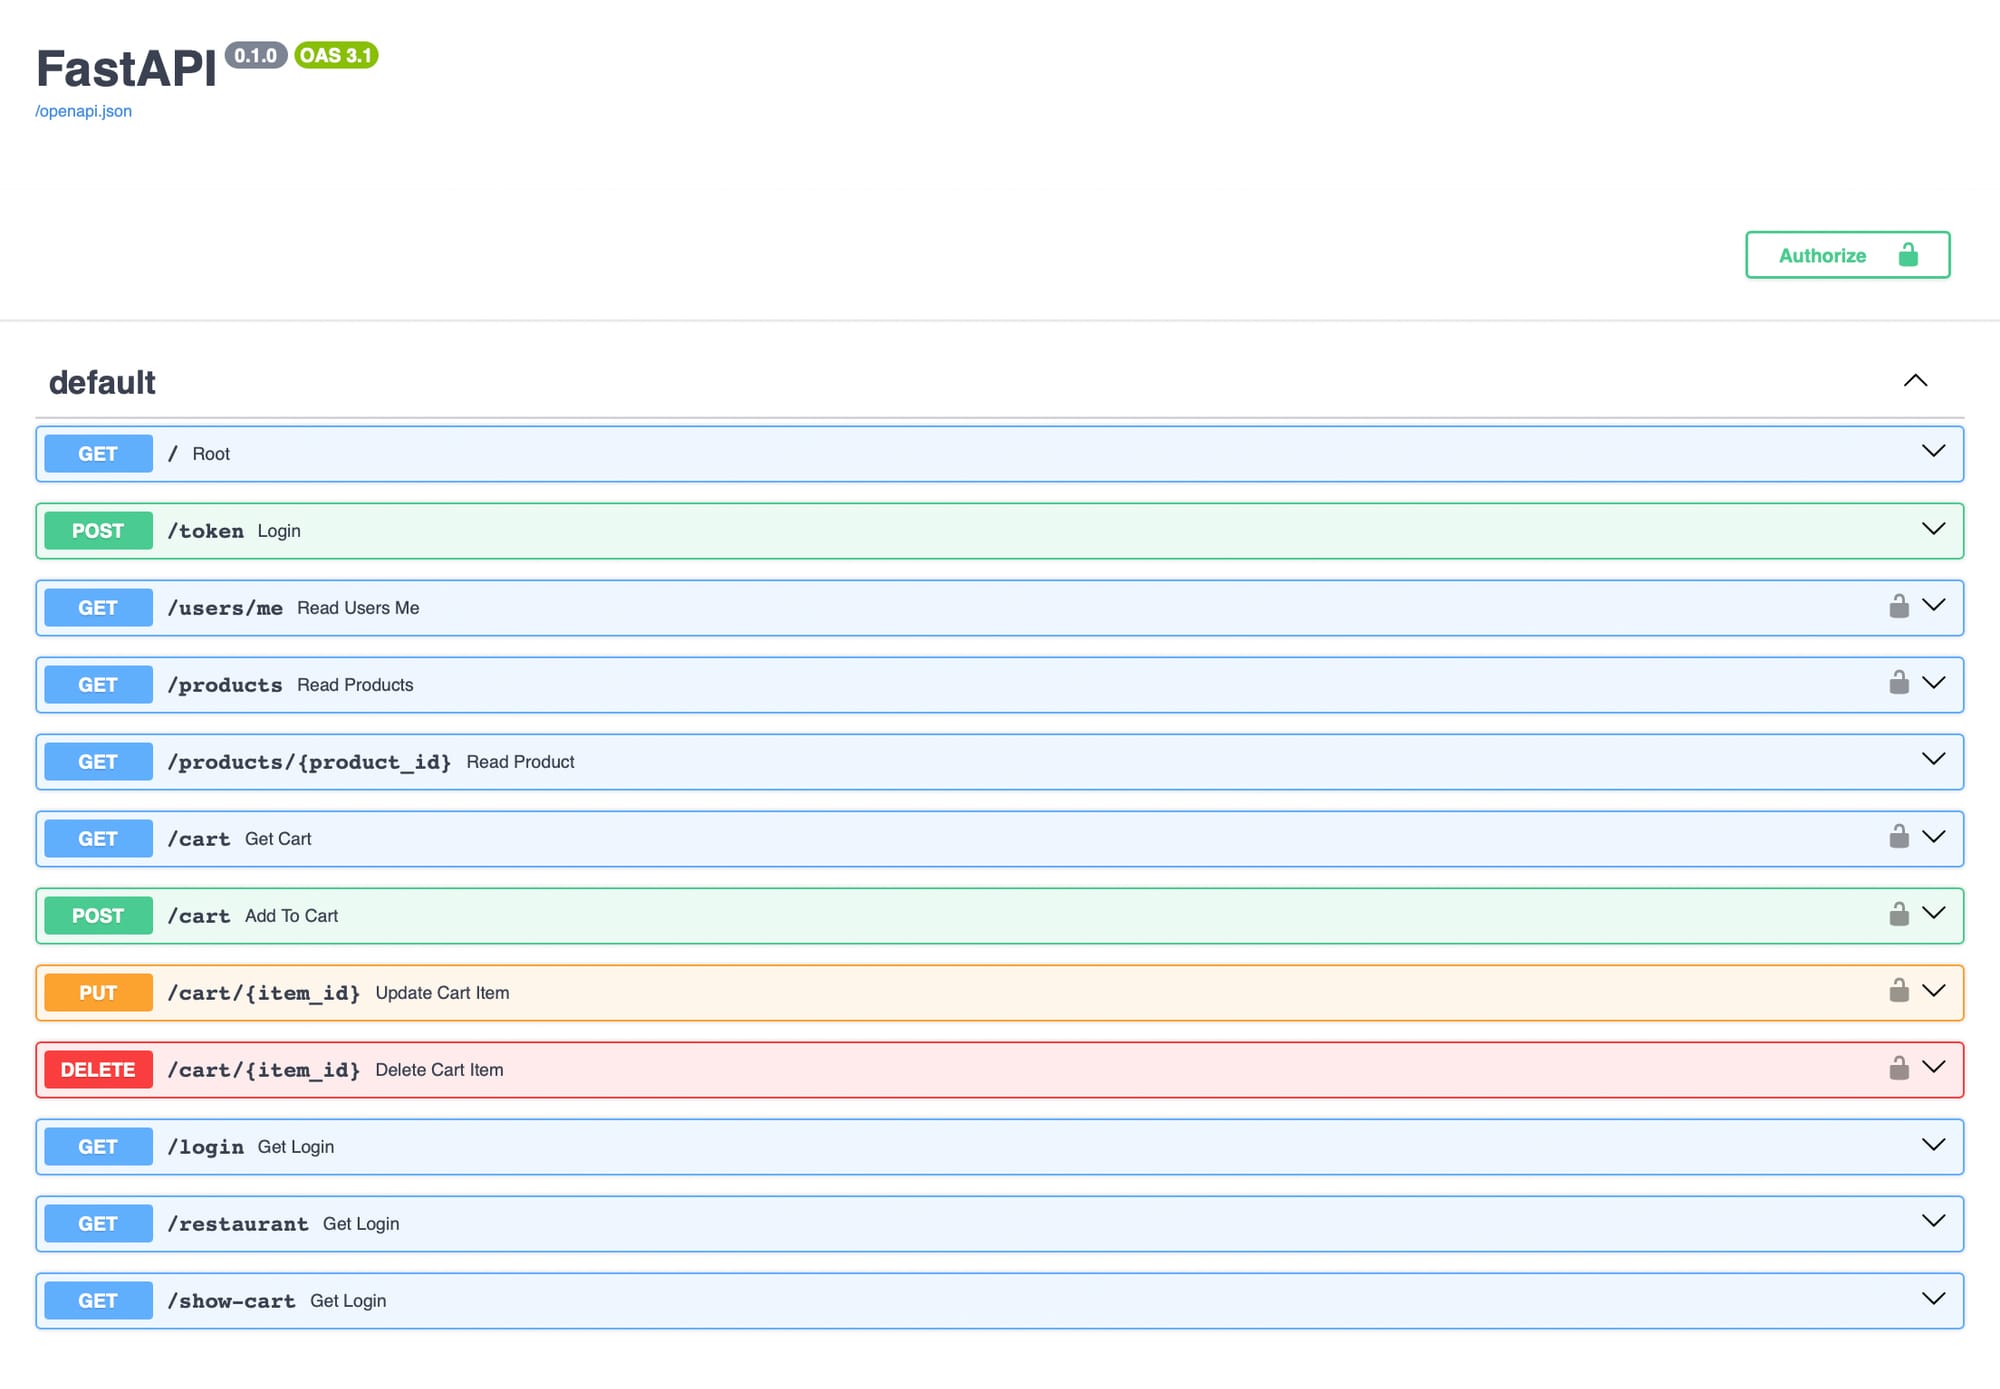
Accesshttp://localhost:8000/docsto view the Swagger UI, where we can interact with your API endpoints.
This setup allows you to run and interact with Turing Taqueria in a local Docker environment, providing a solid base for your development and testing.
Understanding the UI Endpoints in Turing Taqueria
Turing Taqueria includes user interface (UI) endpoints alongside its REST API. The backend API and the UI are combined in a single project for simplicity. However, it's common to separate these aspects in real-world scenarios, often hosting them on different servers.
We can use the REST endpoints to practice writing Data Validation tests using Postman. The endpoints /login, /restaurant, and /show-cart serve HTML pages rather than JSON responses, providing a minimal viable front end we can use to practice writing Selenium tests.
Navigate to the /login page on your local Turing Taqueria instance and use the credentials:
- Username:
admin - Password:
password
These credentials will grant you access to the application's features. Explore the various functionalities, interact with the API endpoints via the UI, and experience how the application handles both backend processes and frontend interactions.
To manipulate the API using the Swagger UI, use the authenticate button in the upper right corner.
Conclusion
In conclusion, Turing Taqueria is a helpful alternative for use with Udacity's Ensuring Quality Releases project. Integrating backend and frontend functionalities in a single FastAPI application minimizes the overhead and allows us to work within the limits of the Azure Lab provided by Udacity.
We gain practical experience deploying and interacting with RESTful APIs and web interfaces by running them locally via Docker. And now, we can use it to write the Postman, Selenium, and JMeter tests locally, allowing us to optimize our lab time.
Addendum: A Special Note for Our Readers
I decided to delay the introduction of subscriptions. You can read the full story here.
If you find our content helpful, there are several ways you can support us:
- The easiest way is to share our articles and links page on social media; it is free and helps us greatly.
- If you want a great experience during the Chinese New Year, I am renting my timeshare in Phuket. A five-night stay in this resort in Phuket costs 11,582 € on Expedia. I am offering it in USD at an over 40% discount compared to that price. I received the Year of the Snake in style.

ReedWeek Timeshare Rental
- If your finances permit it, we are happy over any received donation. It helps us offset the site's running costs and an unexpected tax bill. Any amount is greatly appreciated:
- Finally, some articles have links to relevant goods and services; buying through them will not cost you more. And if you like programming swag, please visit the TuringTacoTales Store on Redbubble. Take a look. Maybe you can find something you like: